
The layout of your home office—specifically where your desk faces and how the room is zoned—affects your focus, posture, and mental state every single workday. Most home office layout setups get this wrong from the start, usually because the desk was bought before the room was measured and the placement was thought through.
Measure first. Plan the layout on paper. Only then buy. What follows is a framework for getting the layout right in any room size.
Desk Placement: The Decision That Drives Everything
Where the desk faces changes how you feel in the room all day. Here’s an honest breakdown of each option:
| Desk Position | How It Feels | Best For | Problem To Watch |
| Facing the door from across the room | Commanding – you see who enters, subconscious sense of control | Most people – especially anyone who feels distracted easily | If the door is busy with household traffic, can be disruptive |
| Facing a wall | Focused – nothing in peripheral vision | Deep work, writing, coding – any work requiring concentration | Can feel claustrophobic in small rooms; add art or a shelf to break it up |
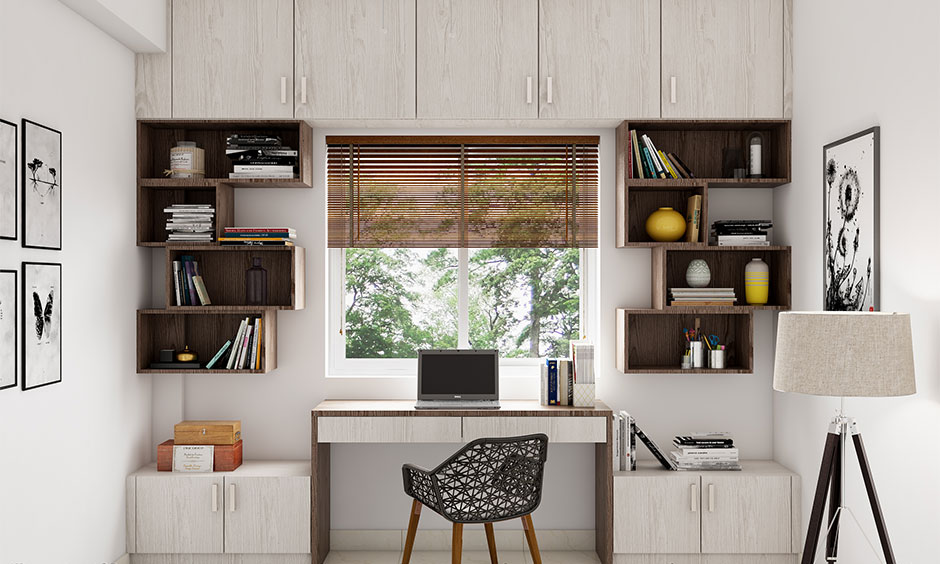
| Facing a window | Bright but screen glare is a serious problem | Creative work – the view can be stimulating | Backlit on video calls; monitor glare requires blackout or tinted glass |
| Perpendicular to a window | The best of both – natural light from the side, no glare | Any work type – most ergonomically and visually balanced | Requires careful room planning to achieve |
| Corner (L-desk, back to corner) | Enclosed feeling – can feel secure or hemmed in depending on the person | People who prefer defined, enclosed work zones | Back to any door – can feel anxious for some; difficult to rearrange |
Zone Planning: One Room, Three Functions
Even a small home office works better when divided into zones rather than crammed together. The three core zones:
- Work zone: Desk, chair, primary monitor, keyboard – the active work area. This gets the prime real estate: best light, easiest access, most ergonomic setup
- Reference zone: Bookshelves, filing, secondary storage, whiteboards – the material you consult but don’t use every minute. Positioned within reach but not at the primary desk
- Recovery zone: A chair, couch, or floor space for reading, thinking, or breaks. Even a small armchair in a corner helps mentally separate work from rest – which matters more in a home environment than an office
In a very small room, the recovery zone may just be a reading chair tucked in a corner. That’s enough. The physical separation – even a few feet – helps.
Layout Templates by Room Size
| Room Type | Dimensions (approx) | Recommended Layout | Desk Type |
| Small spare room | 8×10 ft | Desk centered on the longest wall facing the door; shallow bookcase on the side wall; chair in opposite corner if space allows | Single desk 48″-60″ wide with shelving above |
| Medium spare room | 10×12 ft | Desk perpendicular to window on one wall; L-shape if corner available; storage wall opposite | L-shaped desk or large single + return |
| Large dedicated office | 12×14 ft+ | Desk as room’s focal point (mid-room or facing door); distinct reference wall with shelving; small seating area | Built-in or executive desk; second monitor arm |
| Bedroom corner | Corner area 6×6 ft | Floating wall desk or small L in the corner; bookcase as visual divider from sleep zone | Wall-mounted or compact L-desk |
| Closet conversion | 5×6 ft max | Desk mounted to the back wall; shelving above; open shelves on sides; folding doors close it off when done | Wall-mounted fold-down or fixed shallow desk |
| Open plan nook | Defined corner within larger room | Desk facing into the room (back to wall); bookcase or tall plant as backdrop and sound buffer | Console-style desk that reads as furniture |
Ergonomic Layout Checklist
| Element | Correct Setting | Common Mistake |
| Monitor height | Top of screen at or slightly below eye level | Monitor too low – causes neck strain over time |
| Monitor distance | Arm’s length – roughly 20″-30″ from eyes | Too close – eye fatigue; too far – squinting |
| Keyboard position | Elbows at ~90 degrees; wrists neutral (flat, not bent) | Keyboard too high on surface – wrists bend upward |
| Chair height | Feet flat on floor; thighs parallel to the floor | Chair too high or too low – both cause lower back issues |
| Screen brightness | Match to room ambient light – not maximum | Full brightness in a dim room causes significant eye strain |
| Lighting angle | Light source to side or behind monitor – never behind you on a call | Window or lamp directly behind – silhouettes you on video |
Dual Monitor and Ultrawide Setups: Layout Implications
- Dual monitors side by side: Requires a desk at least 55″-60″ wide for comfortable use without rotating your neck constantly. The primary monitor should be directly in front; secondary at a slight angle
- Stacked dual monitors (primary lower, secondary higher): Works in narrower spaces – needs a desk 48″+ wide and a good monitor arm
- Ultrawide monitor (34″-49″): Functionally replaces dual monitors in a narrower horizontal footprint. Requires a desk at least 48″ wide and good depth (24″+ preferred) so the screen isn’t too close
Cable Management as Layout Planning
Cable chaos is not a styling problem – it’s a layout planning failure. Address it at setup, not after the fact:
- Run all cables down through a cable spine or wire loom from the monitor arms to the desk surface
- Mount the power strip under the desk on a cable tray – all devices plug in from below, not across the surface
- Use a single cable from the desk to the wall, bundled in a wall cable cover if it must cross open floor
- If using a sit-stand desk: cable chain or retractable cable management is essential so cords don’t fight the movement
Common Layout Mistakes
| Mistake | Why It’s a Problem | Fix |
| Buying the desk before measuring the room | Desk too large to allow chair movement; no room for storage | Measure room, draw layout, then shop |
| Placing desk in front of the only window | Screen glare all day; silhouette on video calls | Perpendicular to window instead |
| No dedicated storage – things pile on desk | Visual clutter = cognitive clutter | Add shelving above or a cabinet before anything else |
| Printer on the desk | Wastes 12″-18″ of precious desk surface | Floor or shelf location; only access occasionally |
| Chair with no lumbar support | Chronic back pain accumulates over months | Adjust existing chair or invest in ergonomic model |
| Single overhead light only | Flat, harsh lighting; glare on monitors | Add a task lamp; use a warmer ceiling bulb |
Final Thought
Measure before you buy anything. Sketch the layout with a pencil and graph paper if that helps – it takes 15 minutes and prevents months of annoyance. A well-placed modest desk in a thoughtfully planned layout will outperform an expensive desk shoved into whatever space was left after the furniture went in.


